Thursday, November 17, 2011

It's Soup Season! It's Vegetarian French Onion Soup! For those it gets dark at 4:30 in the afternoon Seattle days


The weather in Seattle. Well how should I describe it. Let me think. Well. To be honest.
COLD AND RAINY (in the winter that is)!
We have had several wet, cold, nasty days here in Seattle over the last few weeks, not to mention it gets dark at oh you know 4:30! As a Southern girl at heart this is hard to handle some days. So what's a gal to do? Get yer man (or lady or yourself)  to make ya French onion soup! As a veghead we have to change the recipe a bit to make it beef stock free so here it is folks veg. French onion soup!

Onion Base:
2 onions
2 tablespoons butter
2 cloves garlic
 this creates your onion base

Broth Case:
1 1/2 tablespoons and 1 quarter water Better than Bouillon vegetable base
1 Tablespoon Soy Sauce

Toasted one inch slices of yummy bread

Swiss Cheese of the local variety (in our case Tillamook cheese!)

Take the onions and cut them long ways, from head to tail.  Then cut in lil' half moons as thinly as possible.  Toss them in the pan with plenty of room and cook on low-medium heat with the butter or oil and garlic (crushed then sliced).  It takes a while, but go slow.  After they're translucent, throw in some flour and cook until separated and just before it browns.

Don't burn it!  It will taste very bad!

Mix up the broth and throw in some spices if you've got em.

Enjoy!
P.S, It goes great with a New Belgium Snow Day Winter Ale and the new Florence and the Machine cd :)


Oxfam for the Holidays!

I have always loved Oxfam's mission and this year's holiday ad campaign caught my eye on the bus ride last night.  This simple yet powerful message is one I just had to share. Unwrap your holiday by considering the true meaning behind the holidays. The illustrator behind the inspired message is Jessica Hische.

http://www.jessicahische.is/lettering/what-you-should-ask-for-this-christmas

http://www.oxfamamericaunwrapped.com/


We're baaaaaack.

Okay so I started this thing then I became homeless for a month, went to NC, moved, and started a job so yeah we've been gone a while. Good news though is that we moved into a super cute place in West Seattle that we totally love. Which is also good news because we have lots of new fun space to decorate and blog about!

Monday, September 26, 2011

Delicious autumn!

It's Fall! Apple Butternut Squash Soup Recipe: 
Okay, here goes the butternut squash apple soup recipe.  I kind of
cook without measuring so its going to have to be adjusted to taste.

1 butternut squash
2 apples
1 yellow onion (there should be around a 3:1:1 squash/apple/onion ratio)
1 liter chicken stock (or vegetable stock)
1 tbsp butter
2 tablespoons hot madras curry powder
1 tsp. cinnamon, nutmeg

Butternut Squash! 


Peal and deseed squash.  Remove the core of the apple.  Chop the
onion.  Put all that in a pot, pour in the chicken stock until it
covers all of the vegetables.  Add the butter.  Simmer until
everything is soft.  At the end add the curry powder, cinnamon and
nutmeg.  Continue to simmer until fragrant.  Remove from heat and
puree.  Add coconut or heavy cream for added thickness.  Add salt to
taste.

You can also add a carrot and a stick of celery if you want more vegetable
flavorings.  Make sure you use good stock or make your own.  If its
not possible to find the hot madras curry powder then do this before
everything above:

Heat a pan over medium heat.  Dry fry 2 tablespoons mustard seed.
cook until almost all seeds are popped.  Slowly add 2 tablespoons of
butter or oil.  add 1 tablespoon turmeric and cumin (whole cumin is
better, ground is fine).  Cook that for 2 minutes over low heat.  Add
to the chicken stock and chopped vegetables.  It should be tasty.


Delicious autumn!  My very soul is wedded to it, and if I were a bird I would fly about the earth seeking the successive autumns.  ~George Eliot

Thursday, September 22, 2011

Children show scars like medals. Lovers use them as secrets to reveal. A scar is what happens when the word is made flesh.


Fall is for Apples.
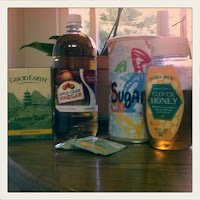
Apple cider vinegar is a natural product of crushed fermented apples with powerful anti-bacterial properties. Apple cider vinegar kills bacteria and helps balance PH levels, it can also absorb excess oil which clogs the pores causing inflammation.

Every day is for green tea & honey.
Green tea has the been know to heal acne scars. It has powerful healing properties and antioxidants for healing acne scars. Honey is a natural antibiotic and moisturizer.

Acne/Scar Reducing Facial Mask

Ingredients:
1 tablespoon apple cider vinegar
2 tablespoons green tea (chilled, just brew some hot green tea then allow it to cool)
7 tablespoons sugar
2 tablespoons honey
Glass jar with lid

*optional- 4 drops jojoba oil and 2 drops eucalyptus essential oil
Final Facial Mask Scrub

In a small bowl combine apple cider vinegar,  green tea 5 of the 7 tablespoons of sugar, honey, jojoba oil and eucalyptus oil together. Mix until evenly combined then add last two tablespoons of sugar into the mixture. Pour into glass jar, put on lid and gently shack to make sure all ingredients are combined. Place in the fridge for ten minutes to thicken.
Apply to face in circular motion, leave on for ten minutes. (The apple cider doesn't smell the best) Rinse face and gently pat dry. Store remaining in the fridge.

Acne/Scar Reducing Toner:
Great to use after the face mask.

Ingredients:
1 part apple cider vinegar to two parts chilled green tea.
Small glass jar or other small bottle.

Fill jar with the 2:1 mixture. Shack well. Using tissue or face cleaning pads wipe on all over face. Let air dry. Follow with your favorite gentle face lotion.

"Turn your scars into stars." Robert H. Schuller


A good laugh and a long sleep are the best cures in the doctor's book.


Bath Salt Mixture for Cold and Flue Season

I get sick a lot and when I do there is nothing like a hot bath to make it all better. This bath salt solution is perfect to add to the tub to help break up congestion, soothe headaches and help you relax. I suggest doing this right before bed when you are fighting a cold or flue.

Materials:
Glass jar (to hold mixture)
A cup or sea salt or epson salt your choice
A drop or eucalyptus
A drop of basil
A drop of fennel
A drop of lavender oil
A tablespoon of sesame oil of jojoba oil

* other optional essential oil ideas to throw into the mixture:
cinnamon, oregano,lemon

In the glass jar combine ingredients and mix throughly together. Stir into hot bath water and enjoy! Store remaining in an airtight container. 

"Every man has a right to a Saturday night bath." Lyndon B. Johnson

Wednesday, September 21, 2011

Scent Memory Solid Perfume

Solid Perfume
God gave us memories that we might have roses in December.  ~J.M. Barrie, Courage
With a few simple materials you can make an on-the-go ladies perfume to throw in your purse.  Bring out the best of memories with one application. 


Materials:
Rubbing alcohol
Glass eye dropper
Two shot glass or small cups
7ml jojoba oil
7 drops frankincense oil
5 drops rose absolute
10 drops grapefruit oil
1/2 heaping tsp grated beeswax
Small pan for melting wax
A small jar, tin or compact

In a small cut or shot glass, measure out 7 ml (or 1.5 tsp) or jojoba oil.  Pour about an inch of rubbing alcohol into a small cup.  Use the rubbing alcohol to clean the eye dropper between dispensing oils in the next few steps, drying the eye dropper with a paper towel so you don't get alcohol in the oils.

Measure out each of the oils, dispensing it into the jojoba oil.

Alrighty, so you take your pan and melt down the beeswax, which should take about a minute or so on high, making sure it doesn't get so hot that it smokes.  We don't have a disposable pan or a pan we can get a bunch of wax on, so we set our tins on top of a piece of aluminum stock, about 0.187" thick (thats 3/16ths).

Finished Product
Once the wax is completely melted, turn the heat down or remove it from heat.  Pour the oil mixture into the melted beeswax and stir it a bit with a disposable wooden stick (coffee stir, kebab stick).  Make sure everything is all melted, applying heat again if needed.  Try not to get the essential oils too hot as they tend to evaporate when they're hot (from what I understand).

Let 'er all cool down and enjoy behind ear!


Tuesday, September 20, 2011

T-Shirt Quilt

My Completed Quilt
The back fabric
T-Shirt Quilts!
You've heard of them before I am sure. Well FOUR YEARS ago I set off to make one of my own. I was moving out of my college house and had all these t-shirts I never worn but couldn't imagine tossing. I would work on it then set it down, move cross country, travel the world or break my sewing machine. It was one thing after another but finally this summer I finished it!

T-shirt quilts are a great way to preserve memories and moments from the past. There are lots of ways to create your own t-shirt quilt. Here is a basic how-to from goosetracks.com. You can follow these instructions or use them for a basic guide. I didn't follow any instructions and just cut up a bunch of shirt sewed them together and tried to make it work as a rectangle best I could then sewed a rectangle piece of fabric as a backing to try and make it all come together. There is no batting in mine because I wanted a lighter weight option.
Good luck and I hope it doesn't take you four years!

"The past is our definition.  We may strive, with good reason, to escape it, or to escape what is bad in it, but we will escape it only by adding something better to it."Wendell Berry


GooseTracks T-shirt Quilt Instructions-
http://www.goosetracks.com/T-Shirt%20Quilt%20Instructions.html


They are based on a 14 1/2" finished square T-shirt block. First, check all your tee shirts to make sure that the designs will fit into a 14" square. If they won’t you can either crop the designs or make the squares larger - just modify the instructions to the dimensions you need. Remember, all the T-shirt squares must be the same size. All seam allowances are 1/4". If you're not sure of the correct size, determine the largest design and cut all interfacing 2" larger than that size, then trim as needed.
Sizes: all sizes include 1 1/2" sashing and a 2" border and are based on a 14 1/2" finished t-shirt block
12 shirts will make a throw-size quilt, approx. 48" x 64" - 3 across x 4 down.
20 shirts will make a twin size quilt, approx. 64" x 82" - 4 across x 5 down
30 shirts will make a full size quilt, approx. 82" x 96" - 5 across x 6 down.
36 shirts will make a queen size quilt, approx. 96" x 96" - 6 across x 6 down.
42 shirts will make a king size quilt, approx 110" x 96" - 7 across x 6 down.
Step 1 - Select Shirts 


Step 2 - Fusible Interfacing - Each shirt must be backed with non-woven fusible interfacing to prevent it from stretching. Buy enough fusible interfacing to make a 17" square for each T-shirt. Select good quality, light weigh interfacing. Fusible interfacing needs to be non-woven, glued only on one side.


Step 3 - Fabric for Sashing/Border/Binding - Sashing strips form a decorative grid between each T-shirt block. Plan on 2" sashing strips (1 1/2" when finished) between the blocks, 2 1/2" strips (2" when finished) for the border, and additional fabric for the binding. Calculate the amount needed and be sure to wash it before you use it - you want to be sure that the color won’t run and that the fabric will not shrink after the quilt is finished.


Step 4 - Cutting Shirts - Separate the front of the shirt from the back. Make sure the shirt is smooth, iron if necessary. You want your shirt side to be larger than 15 inches square  - ideally larger than 17 inches to fit the interfacing.  After you apply the interfacing you will cut the shirt square to the desired size.


Step 5 - Fusing - Cut interfacing into 17" squares - one for each shirt. Don’t piece the interfacing, it will show through. Position the interfacing with the resin side down on the wrong side of the t-shirt, trying to center the design as much as possible. Follow the manufacturer’s instructions for fusing to the back of each T-shirt. Use a press cloth so you don’t get any glue on your iron.  Beware of wrinkles - once cool they won’t come out!


Step 6 - Cutting the Squares - This is where you cut your t-shirt square. Square up each fused shirt to 15".  Make sure you center the design and lettering - measure twice - cut once! Cut with scissors or rotary cutter.


Step 7 - Arranging - Lay out squares on the floor and arrange. Alternate light/dark, busy/not so busy. Make sure the blocks can be read from the desired direction.


Step 8 - Completing the Quilt - add sashing - Sashing strips are the horizontal and vertical strips between blocks. The horizontal strips should measure 15" in length x 2" wide. Cut enough sashing strips to add to all the t-shirts except the bottom row. Then sew horizontal strips to the bottom of each block, except the blocks in the bottom row. Sew blocks together to form columns.
After all the blocks are sewn into columns, make long 2" sashing strips slightly longer than length of each column. Sew the 2" sashing strips onto the inside edge of the completed columns, one strip to each column (don't sew a sashing strip to the outside edges of the columns) and sew the columns together.  Cut off excess fabric.  Press toward sashing.
Cut border strips 2 1/2" wide and add as desired. If you need to do a final pressing, make sure you put a cloth over the shirts - the designs may smear if the iron is placed directly onto them.
Finish - Layer backing batting and quilt top. Baste or safety pin together. If you have some experience machine quilting you can quilt your quilt or you can tie it to hold the layers together. Bind your quilt and be sure to add a label.
http://www.goosetracks.com/T-Shirt%20Quilt%20Instructions.html

Tuesday, September 13, 2011

I don't want FOP Damn it, I'm a Dapper Dan Man!

Men's Hair Care Pomade

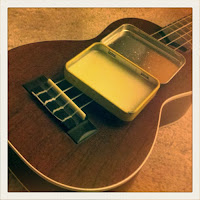
Tommy was sick and tired of going to buy pomade at the store, seeing the outrageous pricetag, and then heading home empty handed.  At $15 or more a can, certainly there must be an alternative.  Well here it is -- melted bees wax, jojoba oil, lemon essential oil, the plucked flowers off of a few basil plants, and voila. If you're saving a few bucks, just use olive oil.

Step One
Step Three
Find yourself a nifty candy tin.  This fine specimen came all the way from Shanghai on our Semester At Sea voyage, but we've also reused containers from La Vie de la Vosgienne candy, Newman's Own mints, Vermints, and Altoids.

Step Two
Pick up some bees wax for one or two dollars at any half-decent grocery store. The folks at the Metropolitan grocery store gave us funny looks, but I think Whole Foods carries it. I think it was only an ounce or two.

Step Three
Melt down the beeswax either inside the tin or inside a clean, empty bean can.  Be patient, heat it slowly, and be careful.  Once it's melted, slowly add the jojoba oil.  I used olive oil originally but jojoba is nicer.  Trader Joe's has it for $7 a bottle and it can also be used for skin moisturizer.

Final Product
Variations and Tips
I added lemon essential oil and some plant product, but be extra careful adding anything that has water in it.  The oil will evaporate the water and it will spit and could burn you.  Do this right before you cool it off.  In the photo, the tin is sitting on a piece of scrap aluminum as a heatsink, so that the heat is spread evenly and I don't have to deal with the uneven electric burner.

"Well, it didn't look like a two-horse town, but try finding a decent hair jelly." 

Welcome!

Welcome to We Shine Forth! A new blog about life. love. and the pursuit of happiness. A space where we can share craft projects, handmade love, social movements and everything in-between. We hope you enjoy, share and continue to create each and every day....

peace.
leah leigh & tommy o